Setting Options
At the very beginning, GeSS was a pure command line program. Over the time, efforts have been made to make it a bit more user-friendly, though it is not intended to build a GUI to operate it. Since the point is to automate processing a lot to run it mostly unattended, it would be stupid to ask the user to click on buttons all along the process.
That being said, GeSS works with options files, three of them for now. Setting these options can be a bit tedious, in particular since it is going to be the first thing you will need to do before running anything. In order to ease the process, small GUIs have been developped to assist you.
This section is an attempt at explaining in the clearest possible way what these options files need to specify and how.
So sit back, relax and keep on reading…
GeSS options files
There are three default options files that are mandatory:
gess.cfg, which specifies preferences for your usual image processing worflow. This is required for processing a session in Interactive mode or Command line mode, as well as gathering sessions with Multisession mode.
loop.cfg, passing additional options required by Loop mode.
copyback.cfg, passing additional options required by Copyback mode.
A clean version of these files is created the first time the package is loaded. The location where they are stored depends on your OS:
Windows: %USERPROFILE%\gess (copy this in Windows Search bar)
Linux and Mac OS: /usr/home/gess
These files are written in JSON format, a human-readable format, editable in any text editor.
If you do not feel comfortable editing these files manually, you can open a graphical editor for each of these, by typing one of the commands below:
gess -o         # edit gess.cfg
gess -ol        # edit loop.cfg
gess -oc        # edit copyback.cfg
These are the three default files. But you can write as many as you want and store them in the same location.
The default files are supposed to reflect your typical worflow and preferences, the ones you would like to execute most times. But if you are using multiple setups or multiple imaging software, you could create as many as required and call them to process your different sessions. All the modules that use the default cfg files also accept additional cfg files. Additional cfg can specify only a few values that differ from your default cfg or the whole set of options.
Setting gess.cfg
This is the most important option file, as it defines your preferred processing worflow. This section lists all its keys and values.
If you’ve chosen to edit via the GUI, you will need to type:
gess -o # edit gess.cfg
You will see that the different parameters are organized in 3 tabs:
Preferences
Processing
Folders
as shown below.
Hovering above any of the fields will display tooltips.
Preferences
The Preferences tab gathers all the options regarding general preferences.
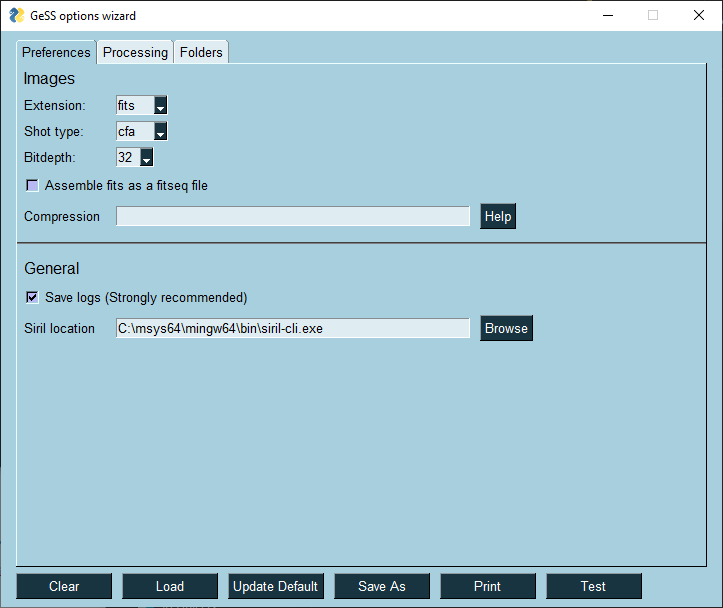
The values for each key is detailed in this table, in the order shown in the image above.
Key |
Type |
Value |
Comment |
|---|---|---|---|
ext |
str |
fit/[fits]/fts/raw |
The extension of your FITS file as saved by your imaging software. Special case for raw, see below. |
shottype |
str |
cfa/mono |
The type of images, either cfa (color) or mono. |
bitdepth |
int |
16/32 |
The bitdepth to use in Siril, either 16b integer or 32b float. |
seqasfitseq |
bool |
true/false |
If true, the fits are converted to a single multi-image container, known as fitseq. |
compression |
str |
Leave blank to use current settings from Siril. Otherwise, this should be the string passed after setcompress command. |
|
debug |
bool |
true/false |
If true, each module will save a *.log file keeping trace of Siril execution and module messages. |
sirilexe |
str |
Leave blank to use Siril installed version. Specify a path to use a development version instead. |
Note:
Setting ext key to raw can be used for handling one special case: in case your imaging software also saves *.jpg or other compressed format along with the raws for faster preview. In that case you must specify raw so that gess sends a convertraw command instead of convert. Only raw files are selected for conversion.
When the raws have been converted, the FITS files will used a *.fit extension (no choice here).
Apart from this case, you can use one of the three FITS extensions even if you are shooting with a DSLR. The universal convert command will handle this perfectly.
Processing
The Processing tab sets all the options regarding how you want to calibrate your images and which processing steps you want to execute after calibration.
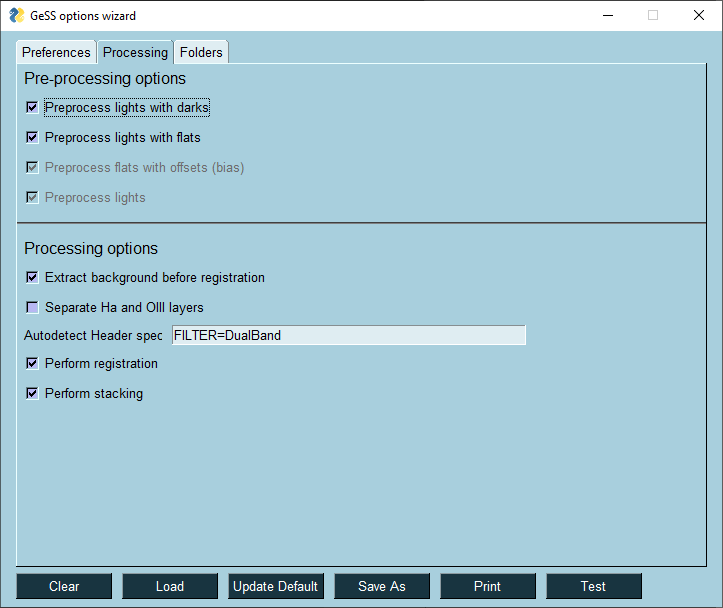
Table below gives the values and types for the different keys, in the order shown in the image above. Further explanation is given right after.
Key |
Type |
Value |
Comment |
|---|---|---|---|
ppdark |
bool |
true/false |
If true, calibrate lights with darks |
ppflat |
bool |
true/false |
If true, calibrate lights with flats |
ppoffset |
bool |
true/false |
If true, calibrate flats with offsets |
pplight |
bool |
true/false |
If true, calibrate lights |
dobkg |
bool |
true/false |
If true, perform background extraction on preprocessed lights |
doHO |
bool |
true/false |
If true, perform Ha/OIII extraction before registration |
autoHOspec |
str |
A specifier string, such as FILTER=DualBand to automatically trigger HO extraction |
|
doregister |
bool |
true/false |
If true, perform registration |
dostack |
bool |
true/false |
If true, perform stacking |
ppdark, if true, will instruct gessengine to do mainly two things:
if you shoot darks along with each imaging session, it will stack them into a masterdark. This step is skipped if you use a darks library.
it instructs gessengine to calibrate the lights with the masterdark.
Same applies to ppflat and ppoffset. Before stacking the flats, they will be calibrated by the masteroffset.
As substracting a masteroffset from flats is mandatory in the processing workflow, the GUI does not leave a choice whether to set ppoffset to true or false. The value is determined from ppflat and is exposed for information only.pplight is always set to true via the GUI.
dobkg, if true, will instruct gessengine to perform background extraction with a polynom of degree 1 after lights calibration.
doHO, if true, will instruct gessengine to perform Ha/OIII extraction. After this operation, two sequences are passed to the next step.
autoHOspec is a string specifier that will instruct gessengine to perform Ha/OIII extraction if the condition is true. The specifier is formed as KEY=VALUE, where KEY is a valid FITS header key and VALUE is the value that will trigger the extraction. The most obvious example would be FILTER=DualBand, meaning that if the lights header contains the keyword FILTER and that it is set to DualBand then, the condition becomes true and the Ha/OIII extraction is triggered. Warning: This specifier overides the doHO value defined above. Leave empty to conform to the doHO switch.
doregister, if true, will instruct gessengine to perform global registration.
dostack, if true, will instruct gessengine to perform stacking. The parameters for this operation are the same as in the standard Siril scripts. After stacking, if doHO is activated, the Ha and OIII stacked layers are linear matched.
Folders
The Folders tab sets all the options regarding your filing system and conventions.
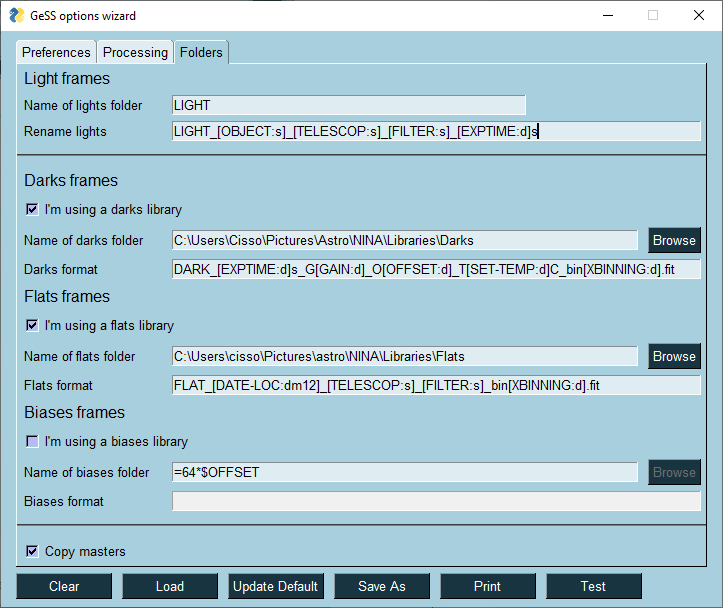
Table below gives the values and types for the different keys, in the order shown in the image above. Further explanation is given right after.
Key |
Type |
Value |
Comment |
|---|---|---|---|
str |
subfolder |
Name of subfolder containing light frames, e.g. light or lights or raw etc…. |
|
str |
Optional name for the converted sequence |
||
str |
subfolder or path |
Name of folder containing dark frames: |
|
str |
Name convention for masterdarks (for library only) |
||
str |
subfolder or path |
Name of folder containing bias frames: |
|
str |
Name convention for masterbiases (for library only) |
||
bool |
true/[false] |
If true, hardcopy the masters in the masters subfolder |
lights is pretty much self-explanatory. You should give here the name convention imposed by your imaging software for the folder where the lights are stored, whether it is light or lights or raw etc…
lightsfmt is the name that you want to give to the lights sequence (without extension). If left blank, the lights will be converted to a sequence named after lights field. For instance, LIGHT_00001.fits, LIGHT_00002.fits etc…
Now you could want to use some info contained in your lights header to parse a more meaningful name. In this case, you can define here a format specifier. The full details on naming conventions are given in darksfmt.Example:
A specifier like LIGHT_[OBJECT:s]_[DATE-OBS:dm12]_[TELESCOP:s]_[FILTER:s]_[EXPTIME:d]s would result in your lights being converted to:
LIGHT_M31_2021-02-01_NEWT200F5_DualBand_300s_00001.fits etc
As this initial sequence name is then passed on to all the following sequences, the resulting stacked image will also have this string embedded.
Warning
It can be handy to tag your sessions as shown above with a date field ([DATE-OBS:dm12]) if you are shooting a target over one single night. But beware, if you are imaging over multiple nights, you will end up with calibrated frames over different nights belonging to sequences with different names. This would prevent multisession or copyback modes to properly gather shots from different nights.
For darks and all the other calibration frames, the same philosophy applies:
If you shoot them with every session, darks is a string giving the subfolder name, say “darks”, “dark”, etc…as defined by your imaging software.
If you want to use a darks library, tick the I’m using a darks library box. This will enable the Browse button. Click on it and navigate to the folder containing your masters, confirm to save the location.
If you opt-in for the library method, you will need to define as well the darksfmt field, see below.
For darksfmt and all other fmt fields, you need to specify the name convention to identify the masterdarks adequate to process your lights. In the figure above, you can see for example:
DARK_[EXPTIME:d]s_G[GAIN:d]_O[OFFSET:d]_T[SET-TEMP:d]C_bin[XBINNING:d].fitall the terms between brackets are formed as follows: [KEY:fmt]
KEY is any (valid) key from the lights FITS header
fmt is a format specifier, such as d for integer, f for float or s for string.
For instance, [EXPTIME:d] will be parsed to 60 if the lights have been exposed for 60s. But would be parsed to 60.0 if you specify [EXPTIME:0.1f].you can find all the keys of a FITS using Siril. Open a FITS file (a light for this example) and head to Menu->Image Information-> FITS Header. It should display a window like this:
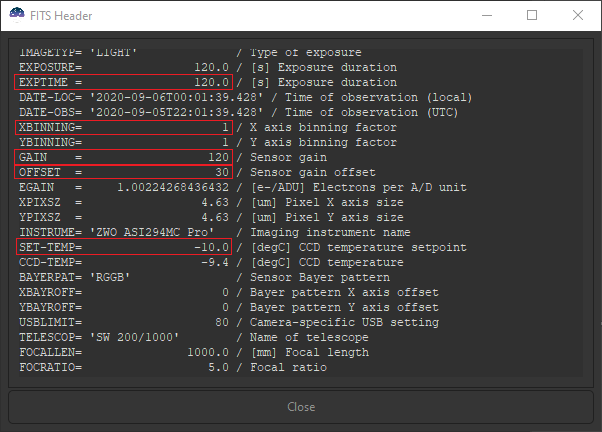
The framed values are the ones used in the fmt string: DARK_[EXPTIME:d]s_G[GAIN:d]_O[OFFSET:d]_T[SET-TEMP:d]C_bin[XBINNING:d].fit
The corresponding masterdark name would be DARK_60s_G120_O30_T-10C_bin1.fitTable below recalls which FITS headers are read to parse the name of which master:
Master
reads header from
darks
lights
flats
lights
biases
flats
In order to parse a date from a date-time header key, you can use the special non-standard formatter dm12, which means date minus 12h.
For instance, if in a header, the key DATE-LOC has a value of ‘2021-01-01T00:01:01.000’, [DATE-LOC:dm12] would convert to ‘2020-12-31’, which was the date at the start of the night.
You can also use special formatter dm0 which will just parse the date, without substracting 12h.In order to parse RA and DEC info from OBJCTRA and OBJCTDEC header keys, you can use the special non-standard formatter ra and dec.
For instance, if in a header, the keys OBJCTRA and OBJCTDEC have a value of ‘02 34 30 and ‘+61 23 07’ respectively, [OBJCTRA:ra]_[OBJCTDEC:dec] would convert to ‘02h34m30s_+61d23m07s’.There is no such thing as a FITS header for RAW images from a DSLR. However, some fields are still extracted from exif data and converted to standard FITS header keys for you to tag your images:
INSTRUME: the name of the camera
ISOSPEED: the iso setting of the shot
EXPTIME: the exposure time in s
DATE-OBS: the date and time of the exposure
biases are the only masters that accept a special string, in lieu of a path, to trigger the use of synthetic offsets. More details about the values and formats to be used can be found in this tutorial.
During the processing of a session, gess will create a masters folder within the working directory. This provides a handy way to keep the masters once you are done processing a session. You can then simply delete the process folder altogether and keep your working directory tidy.
copymasters is an option to make a hard copy, not a symlink, of each master coming from libraries in this masters folder.
In case you want to process the same session later, all the masters are here, stored together the lights to be calibrated, with the same versions as when the session was shot.
Note: For masters which are stacked during the processing of the session, so not from libraries, there is no choice, they are hard-copied in the masters folder.
General notes on masters:
You do not need to settle for an all-library or all-subfolder approach. Each calibration frame type can have its own specification. The example above specifies libraries for darks and biases and subfolder for flats.
All these values are read (or not) depending on the keys given for preprocessing (ppdark, ppflat and ppoffset). For instance, if ppdark = false, it does not matter if there is something in darks and darksfmt. These values are just ignored.
On the contrary, if ppdark = true, then there must be something specified at least in darks and possibly in darksfmt.
For advanced users: using wildcards in mastersfmt
It could be that you want to use some key value in your masters name that do not match the key value in the frames to be calibrated.
With an example, it may be a bit clearer:
Say, you want, in your masterflats names, to keep record of their exposure time. Something like: FLAT_1.32s_Halpha_G120_O30.fit.
If you put a field [EXPTIME:0.2f] in flatsfmt, it will end up with an error. Because the EXPTIME key will be read from a light frame, not a flat…
There are 2 ways to deal with this situation:
If you do not plan on using Loop mode to build your masters libraries, then just replace the token to be ignored by a wildcard sign: *. In the flats example above, flatsfmt would become: FLAT_*s_F[FILTER:s]_G[GAIN:d]_O[OFFSET:d].fit
If you plan on using Loop mode for building libraries, then you cannot just ignore this altogether, as loop will need this information to name your masters. You still need to make use of a wildcard character, but this time at the start of the token.
In the flats example above, flatsfmt would become: FLAT_[*EXPTIME:0.2f]s_F[FILTER:s]_G[GAIN:d]_O[OFFSET:d].fit
GUI buttons
The buttons at the bottom of the interface have the following effects:
 Clear all the entries for all the keys and restore defaults (mostly blank strings so beware! You should get a warning before everything is cleared if case you have not saved before).
 Load an existing cfg file. You can use this either to load gess.cfg (the default file) or to load another one to rework it.
 Save the current options as your new default. This will overwrite the current gess.cfg file. As this one is particularly important, you will get a warning just to confirm this is indeed what you intend to do.
 Save the current options as another cfg file. This can be useful if you use different setups or want to test alternative options without modifying your default. It is recommended to name it gess*.cfg to recognise its type easily as there will be other types of option files in the same folder.
 Press print to display all the current values to the terminal. This is useful to find out the names of the different options (you will not use the GUI forever and better start learning their names…).
 Run a test with the options as currently set in the interface. This will call gessengine in dryrun mode. Meaning that only the folders checking and preferences passing is done. Gessengine will not go into all the processing of the images but if this test is succesful, it could mean that you are almost acertained that this set is valid.
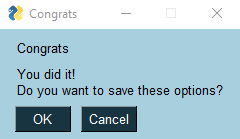
If the test is validated, you will get a window proposing to save this set of options (so that you cannot forget). Save it as gess.cfg to make it the new default or to an alternate name like with the Save As button.
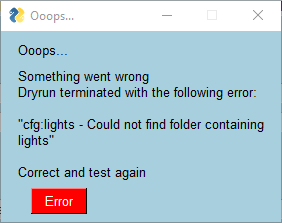
If the test fails, you will get a window telling you where it went bad. Try to fix this re-reading this section and test again.
gess.cfg JSON File
Once you’ve set these options through the graphical interface, you can always go to the options location and review gess.cfg. (You could also modify it from there…) The file created by the GUI with the values shown in the figures above will look like this:
{
  "ext": "fits",
  "shottype": "cfa",
  "bitdepth": 32,
  "seqasfitseq": false,
  "compression": "",
  "debug": true,
  "sirilexe": "C:\\msys64\\mingw64\\bin\\siril-cli.exe",
  "ppdark": true,
  "ppflat": true,
  "ppoffset": true,
  "pplight": true,
  "dobkg": true,
  "doHO": false,
  "autoHOspec": "FILTER=DualBand",
  "doregister": true,
  "dostack": true,
  "lightsfmt": "LIGHT_[OBJECT:s]_[TELESCOP:s]_[FILTER:s]_[EXPTIME:d]s",
  "lights": "LIGHT",
  "darks": "C:\\Users\\Cisso\\Pictures\\Astro\\NINA\\Libraries\\Darks",
  "darksfmt": "DARK_[EXPTIME:d]s_G[GAIN:d]_O[OFFSET:d]_T[SET-TEMP:d]C_bin[XBINNING:d].fit",
  "flats": "C:\\Users\\cisso\\Pictures\\astro\\NINA\\Libraries\\Flats",
  "flatsfmt": "FLAT_[DATE-LOC:dm12]_[TELESCOP:s]_[FILTER:s]_bin[XBINNING:d].fit",
  "biases": "=64*$OFFSET",
  "biasesfmt": "",
  "copymasters": true
}
Setting loop.cfg
Setting this option file is required to use GeSS Loop mode. This section lists all its keys and values.
If you want to edit via the GUI, you can launch it with:
gess -ol # edit loop.cfg
Hovering above any of the fields will display tooltips.
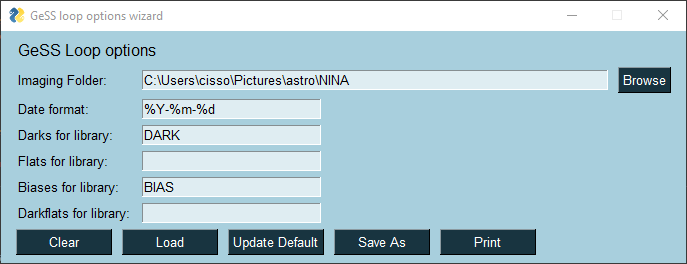
Table below gives the values and types for the different keys, in the order shown in the image above. Further explanation is given right after.
Key |
Type |
Value |
Comment |
|---|---|---|---|
imagingfolder |
str |
the path where all your images are stored. Usually the same as defined in your imaging software. |
|
str |
%Y-%m-%d |
a format specifier to parse the date to be searched for. |
|
str |
If blank, uses gess.cfg darks settings. If subfolder is passed, all subfolders containing this string will be used to build new masterdarks |
||
str |
If blank, uses gess.cfg flats settings. If subfolder is passed, all subfolders containing this string will be used to build new masterflats |
||
str |
If blank, uses gess.cfg biases settings. If subfolder is passed, all subfolders containing this string will be used to build new masterbiases |
datefmt is used to parse the string that will be searched for in imagingfolder. Check the configuration from your favorite imaging software.
This is used if you do not pass an argument searchstr= to gessloop. The date is then taken as the current date minus 12h to find back the date at the start of last night session. And the date string is built according to datefmt.Example:
Let’s assume that you have the following keys in loop.cfg and your imaging folder tree looks like this:
{
  "imagingfolder": "C:\MyAstropics",
  "datefmt": "%Y-%m-%d"
}
MyAstroPics
├── CaliforniaNebula
│   └── 2021-01-03
├── RosetteNebula
│   └── 03-01-2021
├── M31_2021-01-02
└── M31_2021-01-03
Note: Hopefully your imaging folder will never look like this mess!
Now say you launch gessloop (gess -l) on Jan 4th in the morning.
The following folders will be crawled, searching for frames:MyAstroPics\CaliforniaNebula\2021-01-03
MyAstroPics\M31_2021-01-03
If you want to process MyAstroPics\M31_2021-01-02 instead, you should use the command: gess -l searchstr=2021-01-02
Finally, if you want to process MyAstroPics\RosetteNebula\03-01-2021, you should change datefmt to “%d-%m-%Y”.
darks2lib and all other 2lib keys are used to build automatically masters libraries. You can leave them blank if you do not want to use this feature, although it is recommended to set these fields correctly in case you change your mind later.
How it works: if you have a path to a darks library specified in gess.cfg (darks), you need to specify here the name of the subfolder where individual darks are stored by your imaging software. While crawling the folders, gessloop will detect these subfolders, stack the darks to new masterdarks and copy them to your darks library.Example: with the following settings
in gess.cfg (3rd tab - Processing):

in loop.cfg:

All the darks found in subfolders DARK will be stacked and saved to:
C:\Users\cisso\Pictures\astro\NINA\Libraries\Darks.
The masterdarks are named according to the convention given in darksfmt:
DARK_[EXPTIME:d]s_G[GAIN:d]_O[OFFSET:d]_T[SET-TEMP:d]C_bin[XBINNING:d].fit
Note
If a version of the same masterdark (with same name) is already present in your library, the old version is saved in subfolder ./previous with date and time appended. So that in case your new masterdark does not come out as expected, you still have a back-up of the previous version to copy back in your library.
the keyword lightsfmt from gess.cfg file, if defined, is used to create sets of lights, in case you can have lights with different characteristics in the same folder (different exposures, different filters etc…).
For instance, if you have set lightsfmt to
“LIGHT_F[FILTER:s]_[EXPTIME:d]s_G[GAIN:d]_bin[XBINNING:d]”
gessloop will find subsets of lights based on this naming convention and create as many folders as required to symlink copy the different kinds of lights before processing. This field is particularly useful to keep your processed files organized if you plan to use Copyback on sessions with multiple filters.Note: if you are working with masters libraries, the same applies to calibration files (darks, flats etc) without you specifying anything. So if you plan to store more than one set of calibration frames in the same folder when you shoot them (i.e. shooting multiple darks with different exposures during the same night and storing them in the same folder), you should be using a library approach. Even if it is a temporary one.
loop.cfg JSON File
Once you’ve set these options through the graphical interface, you can always go to the options location and review loop.cfg. (You could also modify it from there…) The file created by the GUI with the values shown in the figures above will look like this:
{
    "imagingfolder": "C:\\Users\\cisso\\Pictures\\astro\\NINA",
    "datefmt": "%Y-%m-%d",
    "darks2lib": "DARK",
    "flats2lib": "",
    "biases2lib": "BIAS",
}
Setting copyback.cfg
Setting this option file is required to use GeSS Copyback mode. This section lists all its keys and values.
If you want to edit via the GUI, you can launch it with:
gess -oc # edit copyback.cfg
Hovering above any of the fields will display tooltips.
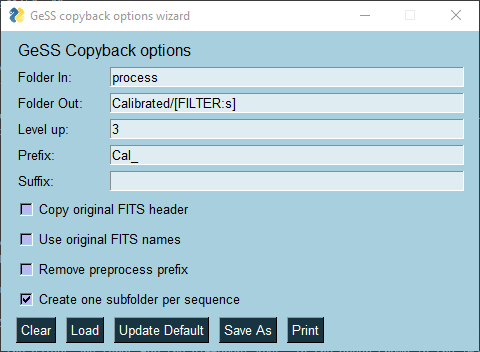
Table below gives the values and types for the different keys, in the order shown in the image above. Further explanation is given right after.
Key |
Type |
Value |
Comment |
|---|---|---|---|
str |
process |
The string to identify the folders to be searched for. Leave the default value process if your sessions have bee processed with GeSS. |
|
str |
The string to build folders names. They can contain FITS headers keys to be parsed (see below) |
||
int |
>0 |
The number of levels up to store your files (see below) |
|
str |
Any prefix you would like to add to the calibrated lights names |
||
str |
Any suffix you would like to add to the calibrated lights names |
||
bool |
false |
If true, it will find the original uncalibrated light frame and copy its full header to the calibrated frame. |
|
bool |
false |
If true, it will replace the calibrated light frame name with that of the orginal uncalibrated frame. |
|
bool |
false |
If true, it will remove the all the preprocessing prefixes (pp_,ppd_ etc…) from the calibrated frame name. |
|
bool |
true |
If true, it will create one subfolder per sequence in folderout |
folderin is used to search your imaging folder as defined in loop.cfg file, for folders containing calibrated light frames. Normally, you should leave the default value, i.e. process, as this is the folder base name into which gessengine will store calibrated frames.
folderout is used to generate a filing architecture from the top level folder where you want to store calibrated frames. This can be a multiple level folder naming convention, mixing regular strings and FITS headers keys, which will be parsed based on values found in the frames to copy.
levelup is used to determine how many levels up it should go relative to the folder where the calibrated frames are stored. Consider the following example:
MyPics
└── M31
    └── NEWT200F5
        ├── 2021-03-29
        │   └── DualBand
        │       ├── LIGHT
        │       ├── LIGHT_M31_NEWT200F5_DualBand_180s
        │       ├── masters
        │       └── process32
        ├── 2021-03-30
        │   └── DualBand
        │       ├── LIGHT
        │       ├── LIGHT_M31_NEWT200F5_DualBand_180s
        │       ├── masters
        │       └── process32
        ├── 2021-03-31
        │   └── DualBand
        │       ├── LIGHT
        │       ├── LIGHT_M31_NEWT200F5_DualBand_180s
        │       ├── masters
        │       └── process32
        └── Calibrated
            ├── ppdfdeb_LIGHT_M31_NEWT200F5_DualBand_180s
            └── ppdf_LIGHT_M31_NEWT200F5_DualBand_180s
The same target has been imaged over 3 nights and all the sessions have been processed with loop. Now, the aim is to gather all the calibrated lights contained in each process32 folder to process all the lights together.
A sensible location would be at the same level as the dates folders. Considering the calibrated lights are in a process32 folder, one needs to go up 3 levels to land into NEWT200F5 folder. Then, if folderout is specified as "Calibrated" and option onefolderperseq is set to True, copyback will:
generate the Calibrated folder into NEWT200F5 directory.
create one folder per calibrated sequence (calibrated sequences start with prefixes pp)
copy the calibrated lights into the right folders.
prefix and suffix are used to complement the names of the files copied. Values from FITS headers, if specified, are parsed.
copyheader is used to force the copy of the original (uncalibrated) light file in place of the header written by Siril. Can be useful if you need to retain all the orginal info contained in the initial header.
useoriginalFITSname is used to copy each calibrated light using the original filename instead of the (wonderful) name generated by gess.
removepp is used to tell copyback to remove the pp*_ prefix from the calibrated file names.
onefolderperseq is used to generate one folder per sequence (see the example above).
Warning
Copyback options have been intentionally made very flexible so that you can virtually do whatever you like when moving your calibrated files around. But with great flexibility comes great responsibility. Not all combinations will lead to a filing system that can then be used to finalize the preocessing of your sessions.
For instance, refrain from specifying dates that will end up with non valid sequence names for Siril to process afterwards. Please, think your naming conventions through to make sure files from different sources with same sequence names do not end up mixed in a single folder.
One good practice is surely to use lightsfmt in gess.cfg with sufficient details to make sure you get unique sequence names.
copyback.cfg JSON File
Once you’ve set these options through the graphical interface, you can always go to the options location and review copyback.cfg. (You could also modify it from there…) The file created by the GUI with the values shown in the figures above will look like this:
{
    "folderin": "process",
    "folderout": "Calibrated\[FILTER:s]",
    "levelup": 3,
    "prefix": "Cal_",
    "suffix": "",
    "copyheader": false,
    "useoriginalFITSnames": false,
    "removepp": false,
    "onefolderperseq": true
}